I have witten step by step notes and taken lots of pictures to match, in the hope that it fully explains and covers it, but email me if you have any probs. or need me to explain further. You can also click on the picture to enlarge it. So here goes.....
*******************************
1. Here are the main materials you will need; paper – I have used just plain red construction paper (of course you can use any colour!), dries clear glue, large 6 petal flower punch (or any six petal shape, sizzix, craft robo etc etc), glitter or stickles glitter, Fired brick distress ink pad, small piece of cut ’n dry foam and a cocktail stick (image 1)


2. Punch out 3 of the flower punch, make folds in them as in the picture to obtain the center (image 2)

3. In the first flower, just snip down the side of one of the petals to the middle, in the second flower punch cut away one petal and in the third flower cut away 2 of the petals (image 3)

4. At this stage using your cut ‘n dry foam with the fired brick ink pad, distress all the flower petals around the edges (image 4, 5)


5. Then using your dries clear glue, place some glue onto one of the petals of each of the three flowers and glue one petal over the other as in the picture - make sure you do this on the wrong side of the petals so that when they are glued down you do not cover the sides you have just distressed - (image 6,7,8)


6. Using your cocktail stick, curl all of the petals of each flower, of which there should be 3 (image 9,10,11)


7. You will now need to snip pointy ends off the two smaller flowers – do not snip the biggest flower as this is your base flower (image 12,13,14)


8. Then take the largest flower and add some dries clear glue to the middle, place the next size down flower and place on top, again, place some dries clear glue to the middle of that and place the smaller flower on top and just hold them in place a few second for the glue to adhere. (image 15,16,17,18)


9. With the two petal (i.e the heart shaped piece) again with the cocktail stick curl the petal edges and then keep one curled but, straighten out the other (image 19,20)


Now bring the shape together to make a funnel shape, but not too tight (image 21)

and place some clear dries glue to adhere the edge in place (image 22,23) (if at this stage the straight side of the petal is too straight, using your cocktail stick just gently curl that petal)

and as before snip the pointy end off (image 24)

10. Finally for the single petal, using the cocktail stick, curl the petal at the sides this time (image 25,26)


and also snip the pointy end off (image 27)

and place it in the middle of your flower, securing it in place with some dries clear glue as before (image 28)

The rose is almost complete, now for the final touches.
11. Cut out two leaves either with a die cut, or a punch or even draw it by hand and cut it out, I have used my wizard flower set die in this instance, but any similar leaf shape will do (image 29)

with a bone folder give the leaf some shape (image 30)

decide where you want to place them add some dries clear glue and adhere them in place (image 31,32,33)


12. And finally take your stickles glitter and randomly place some around the petals or even add some dots of glossy accents to resemble raindrops (image 34,35)


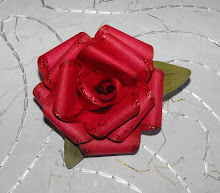
YOUR FLOWER IS COMPLETE - now you have the basis of constructing you can adapt it to suit your projects, I have made smaller ones, different colour, different papers i.e patterened & tissue papers, distress some of the petal edges with a distress tool for a worn look it goes on and on......


I do hope you enjoy this tutorial, I would love to hear your comments and what you think about it, and I'd absolutely love to see any of your projects created with this tutorial.


224 comments:
«Oldest ‹Older 201 – 224 of 224Anicow.com ek popular hindi blog hai jo kai tarah ke
articles publish karta hai jo sirf hindi readers ke liye
bane hai jaise lifestyle tips, shayari quotes, bollywood entertainment,
health tips, technology updates
anicow blog
giloy ke fayde
wow. this article very creative. thanks for sharing
Signal Processing Assignment Help Australia
Digital Signal Processing Assignment help
wow. this article very creative. thanks for sharing
Top Mobile App Development Company In Noida
Top Web Development Company In Noida
Thank you for the work you have put into your nice blog. Home school tutor Squirrel Hill North We will bookmark to your blog because it is very informational. We love the site and will come back to see your new posts.
have been hidden from the public eye.Describes a practice which has been concealed from the public, e.g.Tells the story of
nice post..Cloud Solutions In London
Informative post send flowers to Finland
Really good to see this post Same day gifts delivery Karachi
You need a job search blog service that understands your needs and delivers results especially if you are a high school pass student. Take advantage of our resources to find a govt employer https://www.kaiseonline.com/
I love to make paper flowers Private tutor St. Augustine Your guidance is appreciated
I will try this paper flower tutorial Private tutor Ocala
I appreciate deeply for the kind of topics you post here. Thanks for sharing us such information that is actually helpful. Have a nice day!
Rise Food Mall Noida Extension
Great Post , Follow this Link
http://www.trucktempohire.com
Nice and Useful Post Shared. Choose
Tempo on rent in Vadodara
What a fantastic paper flower tutorial! I'm always amazed at the creativity and ingenuity that crafting enthusiasts bring to their projects, and this one is no exception. The step-by-step guide and the clear photos make it seem so achievable, even for someone like me who's not particularly skilled in crafting.
can i use a walmart gift card for gas
The color choices and the meticulous detailing really bring these blooms to life. They could make for fantastic decorations at various events – from weddings to birthday parties – or even as permanent fixtures in home decor.
security policy prevents use of camera
Your attention to detail and the way you broke down the process made it seem less intimidating. Once again, thank you for your wonderful tutorials and engaging content. Looking forward to more creative inspiration from your blog!
https://www.frugalishness.com/does-planet-fitness-have-showers/
"As a devoted reader, I'm constantly impressed by the relevance and timeliness of the content shared on this blog. The author's ability to stay attuned to current issues while maintaining a timeless perspective is remarkable."
https://www.aintpayingfull.com/
"The thought-provoking discussions sparked by this blog have enriched my understanding of a wide range of topics. The author's ability to ignite meaningful dialogues is a testament to their influence as a thought leader."
https://www.tryvoucher.com/jem-city-discount-code
"A heartfelt salute to the author for curating content that resonates across generations. This blog is a timeless source of wisdom that has the power to inspire and enlighten readers of all ages."
enterprise geico discount
Your blog is evidence of your enthusiasm for knowledge sharing. Being a part of your online community is a pleasure. asus student discount
We are always challenged to think differently by the new insights your site always provides. Keep up the fantastic job!fresh choice coupon
Hi there!
Very cice article, so amazing and informative, helping many around the whole world for sure! Allow me to tell you a little bit about my job: I work with Carros usados e seminovos a venda Comprar e vender carros usados particulares online Compra e Venda Carros usados online! Really nice reading, thank you for keeping us updated
Best regards
Jonathan
Post a Comment