I have witten step by step notes and taken lots of pictures to match, in the hope that it fully explains and covers it, but email me if you have any probs. or need me to explain further. You can also click on the picture to enlarge it. So here goes.....
*******************************
1. Here are the main materials you will need; paper – I have used just plain red construction paper (of course you can use any colour!), dries clear glue, large 6 petal flower punch (or any six petal shape, sizzix, craft robo etc etc), glitter or stickles glitter, Fired brick distress ink pad, small piece of cut ’n dry foam and a cocktail stick (image 1)


2. Punch out 3 of the flower punch, make folds in them as in the picture to obtain the center (image 2)

3. In the first flower, just snip down the side of one of the petals to the middle, in the second flower punch cut away one petal and in the third flower cut away 2 of the petals (image 3)

4. At this stage using your cut ‘n dry foam with the fired brick ink pad, distress all the flower petals around the edges (image 4, 5)


5. Then using your dries clear glue, place some glue onto one of the petals of each of the three flowers and glue one petal over the other as in the picture - make sure you do this on the wrong side of the petals so that when they are glued down you do not cover the sides you have just distressed - (image 6,7,8)


6. Using your cocktail stick, curl all of the petals of each flower, of which there should be 3 (image 9,10,11)


7. You will now need to snip pointy ends off the two smaller flowers – do not snip the biggest flower as this is your base flower (image 12,13,14)


8. Then take the largest flower and add some dries clear glue to the middle, place the next size down flower and place on top, again, place some dries clear glue to the middle of that and place the smaller flower on top and just hold them in place a few second for the glue to adhere. (image 15,16,17,18)


9. With the two petal (i.e the heart shaped piece) again with the cocktail stick curl the petal edges and then keep one curled but, straighten out the other (image 19,20)


Now bring the shape together to make a funnel shape, but not too tight (image 21)

and place some clear dries glue to adhere the edge in place (image 22,23) (if at this stage the straight side of the petal is too straight, using your cocktail stick just gently curl that petal)

and as before snip the pointy end off (image 24)

10. Finally for the single petal, using the cocktail stick, curl the petal at the sides this time (image 25,26)


and also snip the pointy end off (image 27)

and place it in the middle of your flower, securing it in place with some dries clear glue as before (image 28)

The rose is almost complete, now for the final touches.
11. Cut out two leaves either with a die cut, or a punch or even draw it by hand and cut it out, I have used my wizard flower set die in this instance, but any similar leaf shape will do (image 29)

with a bone folder give the leaf some shape (image 30)

decide where you want to place them add some dries clear glue and adhere them in place (image 31,32,33)


12. And finally take your stickles glitter and randomly place some around the petals or even add some dots of glossy accents to resemble raindrops (image 34,35)


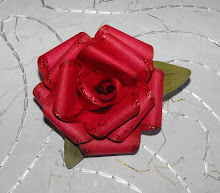
YOUR FLOWER IS COMPLETE - now you have the basis of constructing you can adapt it to suit your projects, I have made smaller ones, different colour, different papers i.e patterened & tissue papers, distress some of the petal edges with a distress tool for a worn look it goes on and on......


I do hope you enjoy this tutorial, I would love to hear your comments and what you think about it, and I'd absolutely love to see any of your projects created with this tutorial.


224 comments:
1 – 200 of 224 Newer› Newest»Brilliant tutorial Maria, the flowers are gorgeous. Thanks for sharing the instructions and making them so clear to follow too.
Waw gorgeous, and thank you for the tutorial! Hugs, Moni
What a superb tutorial Maria - so clear! I shall definitely be having a go at making these. I would never have been able to guess how to begin with them, but your instructions make me feel that I can make them too!
I'm not surprised your blog is so popular. You deserve it!
Becki
xx
Thanks so much for the tutorial, Maria! The rose is really beautiful, I'm going to give it a try.
Hugs, Vanja
Hi Maria,
The tutorial is great i will try these at the weekend.
i have made a card with the images you sent i will post it later on toady. speak soon.
Love Lynsay xxx
WoW!! Fantastic!
What a beautiful rose!! Thanks for the easy step-by-step tutorial!
The rose is amazing! Thanks for the tutorial - I'm going to give this a go.
Pamela
Hi again! I love the paper flower very much and your tutorial was so great that I decided to give it a try today. :) You can see how my rose turned out here. Not as pretty as yours, but since it's the first one I made, I'm satisfied with the result. :)
Have a lovely evening
Vanja
Thanks Maria for a brilliant, easy to follow tutorial. The rose is so pretty-I must have a go!
Love Lynne. XXX
Oh this is sooooooo nice. It's amazing what your habds can do!!!! Thanks so much for sharing. I''l try to make some... I'm sooo excited!
omgosh this is fabulous - I must try this! Thankyou soooooooooo much for a fab tut
-x-
This is amazing! I use to make roses from bread dough but never from paper. Your ROCK! Thanks so much for sharing!
Oh my goodness what a fantastic tutorial! Many thanks
What a beautiful rose!
The tutorial is gorgeous!
I will try it!
wow. Great tutorial! you really have patience to make such beautiful flower. Thanks for sharing.
Eve
oh thank you so much for the tutorial! I just made a card using this and gave you a shout out in my blog! wonderful job!
~anna
Such a pretty flower.....thanks for the super duper tutorial! Excellent job, I may even be able to do this!
Thank you for that great Tutorial!
Hugs, Alex
I love this, so gorgeous and creative! Would you mind if I posted a link for your tutorial from my craft blog? Let me know when you can, thanks!
So pretty! And great instructions and pictures too. I wonder if I have the patiences. :-)
Thanks for sharing.
Great tutorial! Thank you!
That rose is beautiful. What an excellent tutorial. Thanks for sharing!
Your tutorial was very easy to follow and answered all questions. I love the flowers, so now Im going to go try it out...thanks:)
This is so very beautiful, and so easily explained, now to see if I can follow your instructions. Thanks!
Absolutely beautiful,
great tutorial, thanks for sharing,
huggies
Angie
Stunning; thanks so much for the tutorial and pics.
STunning rose - thanks for the tutorial. Will surely try it
Thankyou so so much for sharing this tutorial! Could you maybe scan or draw the image of the punch for us so that those of us who don't have a punch can simply print, trace, and cut? Thankyou!!! Manda. xx
http://kraftypanda.blogspot.com
thats amazing thanks for sharing it.Bea x
WOW!!!
This is beautful!
THanks for taking the time to load up all these photo's; it;s great to see the tutorial!
WOW that is expactacular. Thanks for sharing this tutorial. I go to try.
Thanks so much for the tutorial))))
Oh wow, that is wonderful - I'm going to have to have a go at this. Thanks for sharing. Kim
Super tutorial - thanks for sharing. I might give it a try :)
Wow, I love your tutorial, I came across your blog via Kim Dellow's, I'm sure I will be back. I have the punch that you have used in your demo so will give it a go.
Thank you for this tutorial. I made 2 and they look like they are real.
hugs, moi
Dear Maria, thank you for this great tutorial. I have only found it today and made this card.
Only my punch is much smaller :(
Maria, I have seen many, many instructions for making roses and this is by far the best set of instructions I have come across. Thank you so much for sharing this with everyone.
Peta
Wow! I would have never thought that that beautiful paper rose started out as a six-petal flower punch! Thank you for sharing!
Amazing tutorial. Would love to try but just wanna know if there are other alternatives besides the flower punch? I've never seen one in my life before. So yeah.
Wow! What a great way to use my flower punch! Thanks for the great tutorial!
I have to say that is a very nice tutorial and the flower is simply beautiful
Gloria
Thanks for the tutorial!! You did a great job making it look very easy! I can't wait to try that. Thanks for sharing.
Maria muchas gracias por este tutorial tan interesante. Saludos
Oh wow...this is a paper punch flower I could have sworn that rose made of ribbon. Thanks for the tut.
WOW this is AWESOME!!! Thank you soooo much for your tutorial!
hugs
Brenda
Thanks for sharing - you have given the instructions so well I CANT WAIT TO GIVE IT A TRY X
thank you for these tutorial..
How cool! Thanks!!!! :)
And thanks to Becki cuz I found you through her!
This is brilliant, lovely roses, thank you so much for sharing! (If you don't mind, I'll put a link on my blog to yours, I know a few people who would love this!)
((Lyn))
I love this step by step picture tutorial!! It is very clear and it looks very beautiful Maria!Thanks!
wow what a fantastic tutorial - thank you so much for sharing it with us. I can't wait to have a go.
Debs xx
I will have to have a go, I don't have that flower punch, but I am still going to try it, it is fab! TFS the free tutorial!
What a lovely tutorial, I'll give it a try later today!
Many thanks!
I don't understand step 9, which way do you make the funnel? and how did you make that part of the paper bend back? mine keeps ripping
Thank you for a beautiful tutorial.
Orli
Sorry the above comment made no sense whatsoever! Fabulous tutorial, thank you. I am in the process of making grungeboard flowers with your instructions, and will post them later or tomorrow.
A big thank you
Jennie
Thank you so much for sharing. I don't have a flower punch but just put my slice to good work and I am in LOVE with these flowers.
these are just devine. Thanks for sharing.
Maria, what an awesome tutorial. You made each step so easy to follow and such perfect pictures. Believe me, I know how difficult it is to "teach" and you have perfected it.
Thank you for sharing.
Liz Walters
Prescott, AZ
This is the best tutorial ever! Thank you so much, I love these roses, they are stunning. I made my first one yesterday.
Hugs
Jen x
WOW!!!
Thank you for that great Tutorial!
Svetlana
Wow, so glad I found you! This flower is amazing and you're brilliant! Thank you for making it look so easy!
Blessings, Maria
Excellent tutorial.Thankyou so much you are very kind.Hugs SamXX
Thank you so so much for these easy instructions and sharing your talent.
I am using these flowers on a piece at the moment and when I finish I will link it here for you to see!!
Ok, as promised. Here is the link for the piece I was putting these flowers on.
I am so happy with the end result.
And the flowers just make it I think.
Thank you again for the tutorial.
http://beccym.blogspot.com/2009/06/scrap-therapy-make-believe-masters.html
Wow, what a great tutorial, thanks for sharing it with us. I can see I found it late but I am still so grateful that you posted it. Hugs, Leslie
Wow, Maria what a beautiful rose! Thank you very much for this great tutorial!
It is so easy to made!
Greetings from Germany
Susanne
Wow Maria, this is such a fantastic tutorial, i am definitely going to give this ago soon, thank you for the inspiration, its just what ive needed to kick start my crafting again! hugs Lind ax
Thank you so much for the wonderful tutorial - you're so generous!
Got the link from craft obsessions.
Viv
wow this is fantastic, I have to try it. Thank youfor sharing this- I got the link from Craft Obsessions
x
This tutorial is so cool! Thanks for sharing!
Fabulous tutorial really easy to follow. Made one then couldn't stop myself and have made a summer rose wreath using them. Thanks Ginny
Great!!!!! tenk you. Many greatings from the nedtherlands
Hanny
Wow this is just amazing. The tutorial is so easy to follow. thank you for sharing. It is just gorgeous.
Liam
wow, it looks so so easy to do!!!! Thank you for sharing.
that is breath-taking!! thank you so much for the tutorial!!
....Sharon :)
Wow what a stunning flower tutorial. Thanks for sharing the instructions.
I think this is the most beautiful rose paper I ever seen, so natural, and easy to make. Love love it.
Thanks for sharing this fab tutorial, thought you might like to see some i made, i still need to practice a bit though.
Hugs Tracy x
opps, forgot the link...
here's my flowers>
I can't believe it, i just did it!!!!!!!!!!! wow!!!! Thanks a lot for this tutorial.
Have a flowerlicious day.
XOXO
Wow, what an amazing creating. I bet mine don't turn out like yours .... but I'm going to give it a go. Thank you so much for sharing.
Thanks for posting this tutorial! I can't wait to go try making one. I have been wanting to know how to for some time now.
Thanks again!
hugs
Mary
Wow! Can't wait to find that flower punch and make some of these roses!
Waouh !
It's so beautiful !!
Thanks a lot !
It's so beautiful !
Thanks a lot Maria !
Thanks for sharing how to make those beautiful flowers.
thank you so much for this tutorial!!! it's great!!!
kiss from belgium
Your tutorial is wonderful, and your creativity is amazing! Thanks for sharing!
So glad I found your blog bu blog hopping. Anf this is a wonderful tutorial. Wow!
wow this is brilliant fab idea will be trying to have a go at doing these myself many many thanks love cheryl xxxxxxx
Step-by-step perfect! Thanks for sharing
Amazing... I am going to try soon. Your tutorial is so clear that I can not fail, I hope. Thank you for sharing.
Ellen
awesome tutorial!! thanks for sharing that with us!
Wonderful tutorial! Thank you very much!
Fabulous!!!
Thank you for sharing!
hallo
bin durch eine bastlerin auf deine seite gekommen und hab mich sehr über deinen workshop mit den rosen gefreut,werd mich die woche gleich dran versuchen und bedanke mich ganz herzlich dafür
lg jane
Thank you so much for such a wonderful tutorial!!!!! I Love these flowers!!!!!
What a superb tutorial Maria - so clear! I shall definitely be having a go at making these.
Term paper
Maria you are so inspiring! I wish I could have your expertise.
Thank you so much.
Janice
Thanks for a lovely tutorial and the flowers are gorgeous.
Margaret D.
What beautiful roses!!!! Can't wait to try them.
A friend just sent me a link to your blog and the roses tutorial. I can't wait to play. You make it look so easy and your instructions are great. I am so happy to have found a new blog.
Patkatzer
Clear and precise (as usual), Maria. You always make things look so easy. Thanks for another great tutorial.
WOW! This is fantastic. They look almost identical to the new Prima sets that I bought in purple this past weekend, at my LSS.
Woohoo! I am going to have to try this out!
Your tutorial looks very user friendly
Thanks,
Lisa
Great tutorial! Thank you lots for sharing this technique with everyone. I am busy working for a custom writing service write now, but I am going to try this out when I have some free time. Many thanks.
Love this tutorial! I didn't have a large 6-petal flower, so I was able to design one with the Cricut Design Studio software - turned out great! I'll be making some of these for Mother's Day cards.
Fabulous tutorial! Thank you so much!!!
Adeline
C'est génial. Merci beaucoup pour ces explications si bien détaillées. Commme je n'ai pas la perforatrice j'ai obtenu le même résultat par un système de pliage et découpage. Merci encore
Wow, this is one of the most realistic paper roses I've seen! Well done! I've posted a link. Thanks for sharing!
fantastic roses..
http://www.jobspert.com
Thanks for this. I am using them to make the decorations for a wedding.
Thats really creative and unique thanks for sharing.
Advantage Term Papers – We do it your way
Oh my this is the best tutoria Maria, thank you so much. Mel from Aust
Thanks very clear instruction :)
Von
Hello! wow fantastic article, thanks for sharing your creativity. best weight loss supplement | supplements for weight loss | weight loss appetite | free diet recipes | loss weight quick diet | fat binders
Hi! interesting article, thanks for sharing. July 2010 nursing board exam results | CPA board exam results | let exam results | bar exam results
Love the close up images as I am very visual sort of crafter. Better than a video.
you are wonderfull.I'm waiting you visit. bebegimincicileri.blogspot.com
wonderfull ! thx u very much
xoxo
I had never seen this before and just ran across it. Lovely rose. Thank you for the nice tutorial!
-Rebecca
Really Pretty. Have just put one on a gift wrapped in Pale pink Tissue. I made the flower in cerise to match the cushion inside. I used this silk hand made paper. Thank you.
Regards!
Sample Essays
I don't use tape or glue to affix the end, but it probably is a good idea to do it. They can unroll on the branches, but not too much, so I just kept them as is. I think Martha Stewart did say to glue the end though.
Custom Essay
The Paper Flower Tutorial is really nice thing to know about because the Flowers are those things which weather for real or made by a paper do look amazing in watching them, such kind of information about them is really nice one to get and it is really good to have the instruction for making such a beauty thing.
Sample Essays
The "Paper Flower Tutorial" is really nice to create. I liked the flower's really they are gorgeous, I will 100% try to making these flower's, Thanks MARIA.
Sample Essays
Your blog is really helps for my search and i really like it.. Thanks a lot..:)
research methodology help
The Paper Flower Tutorial is some thing amazing work and art to get know about and I think this is good to have such information about this because it is a nice one to get know about.
Essays
Very nice tutorial. One thought I had, since we are curling the petals back, one could cut a free form flower by hand, and any unevenness would be mitigated because the petal is rolled back...may not need a punch..just a little more work and maybe a pattern..even one printed onto the paper off of the internet.
What a beautiful rose, what a great idea.
marlene
no kidding. you're amazing!!!
Love from Singapore Florist
Lovely tutorial and flowers! Thanks so much for sharing!
Your tutorial is perfect. It was easy to make even with my arthritis in my hands. Thank you this makes a wonderful gift souvenir for my daughter wedding. Thank you Lise
What a brilliant project!!! Thanks for sharing the very detailed step by step instruction. I really like it. florist sydney
I love the roses,
And thanks for the tutorial, it is very usefull.
Greetings from Heleen (Holland)
Toedelsss
Thankyou so much for this fabulous tutorial.I made some beautiful white roses for a wedding card and it really made the card stand out.So many thanks for sharing this with us.XX
Thank you! With a few adjustments to suit the bride, I made 5 bouquets for a wedding!
http://twitgoo.com/214qbo
I am so excited to have found this tutorial; I've been trying to find some way to make paper roses for the past six months and just stumbled on this randomly!
Can i ask, though, what size is that flower punch?
Wow thank uyou for the great tutorial! I have been wnating to make some flowers now I can!!!!
I'm a new follower and can't wait to stop by again!
Hugs, Lisa
cardcraz.blogspot.com
Thank You, Thank You, this is so easy to follow. Your pictures are fantastic. Thank you for sharing.
carolyn
I would like to say this is an excellent blog that I have ever come across. Very informative.
Life For Rent | Life For Rent
Your web page is almost certainly undoubtedly one of the most suitable . Complete appearance of the webpage is actually delightful .
mesquite locksmiths
jupiter locksmiths
Locksmith Walnut Creek
Locksmith Sunnyvale CA
Locksmith Fremont CA
Locksmith Mountain View CA
locksmith in hialeah
irvine locksmith
plano locksmith
mesquite locksmith
miami beach locksmiths
locksmith miami
Aventura FL locksmith
locksmith irvine ca
fort worth locksmiths
locksmith aventura
plano locksmiths
locksmith irvine
locksmith fort worth
hialeah locksmith
miami beach locksmiths
Hialeah FL Locksmith
mesquite tx locksmith
miami fl locksmith
locksmith hialeah
What a stunning project! You make it look so simple to make, and so easy to follow for us, thanks a lot. Cindy@silk bouquets girl
Thanks a Lot!
This flower is great and the TUTO fantasticly easy made by you!
Kisses from Brazil,
Clau
Great tutorial
Thanks for sharing.
the flowers are gorgeous. Thanks for sharing the instructions and making them so clear to follow too.cheapcialis
That rose is so amazing and your article is fantastic.
Gifts to Pakistan
Planning on doing this for my wedding! Ordering a paper punch now, and testing it out once that comes!! Thank you for posting this tutorial!!!!!!!!!
I love the design of your blog. Have you done it by yourself? blinds
yoga retreat
A wonderful workshop - I think I try it next time, too...
LG
Iris
Looks really fun to make, very creative. Using simple materials and turn it into a work of work of art is pretty amazing. I love it. Manny@ flowers sydney
Amazing tutorial!!!!Thanks for sharing!
Exhibition stuffs, it is really appreciable.
Term Papers
Hey Maria ,Thanks a lot for lovely flowrs tutorial.
You made it so simple , step-by step.
Hey Lovely Flowers !! Thanks for the tutorial ... visited via Craftster
It's amazing. That's very interesting indeed. Thanks to a brilliant effort in publishing your article. Brooklyn Bridge
Great website, I really like your blog. You offered a good idea. thanks for sharing such wonderful details.
Atlanta Magazine
Great tutorial...This is so easily explained.
Send Flowers To Pakistan From Australia
Send Flowers To Pakistan From Australia
Send Flowers To Pakistan From Australia
I recently came across your blog and have been reading along.I'm impressed. You're truly well informed and very intelligent. You wrote something that people could understand and made the subject intriguing for everyone. I'm saving this for future use.Led Outfitters
Led Outfitters
Led outfitters reviews
led outfitters reviews
Fantástico tutorial, feliz fin de semana:)
This post is useful and helpful. Most people will definitely assert that everything in your blog site is nice. If you maintain publishing educational content on your online site,
online florists
Hmm… I read blogs on a similar topic, but i never visited your blog. I added it to favorites and i’ll be your constant reader. Portland Florist
Interesting information as presented in an interesting way - I hope that you will frequently update your blog.
florist online
Loved this! Will def use it for my wedding :D
rwHi Maria,
I have only discovered your rose tutorial today. You have done a fantastic job!! I understand it all and can hardly wait to try to make them. I am positive I can do it now with your help.
Thank you so very much!!!
Hugs, Candy xo
I suggest this site to my friends so it could be useful & informative for them also Great effort. Cheap Essay Writing
Fantastic tutorial. Thanks for sharing. Hope I can make some that look as good
Thanks made them for my boyfriend for christmas and he really liked them
Awesome post this post realy helped me at my point of confusion realy thanx for sharing thums up keep it up ;) !!!
Billy Bishop Airport
YTZ Airport
Taxi to Billy Bishop Airport
Love how detailed your tutorial is with the step-by-step directions and pictures. Thank You
I enjoyed alot reading this post. It is instructive, comprehensive and to the point. Well done and thanks.
Nursing Essays
info khusus untuk pria wanita dewasa, kami jual alat bantu sex mnyediakan berbagai macam penis silikon, penis palsu ini merupakan peralatan yang dapat di gunakan kaum wanita untuk di jadikan alat pelampiasan hasrat seksual. selain penis mainan sex wanita kami juga juga jual vagina silikon yang dapat di pakai pria untuk onani / masturbasi.
Most of the time I don’t make comments on blogs, but I want to mention that this post really forced me to do so. Really nice post!I am very excited that I have found your post because I have been searching for some information about it for almost three hours
verhuisbedrijf zoetermeer
I am interested in looking for more of such topics and would like to have further information. Hope to see the next blog soon.
verhuisbedrijf zoetermeer
The custom term paper writers must be good in doing study in specific subjects as each a single could not be acquainted with all the subjects. All the information collected in the thoughts will be framed into words. Typically the client will also specify the word count limit for the essay and alongside with any requirements if needed. The author must adhere to the principles and laws of the business whilst writing an simple. You ought to make sure you are not going to compose anything at all bad or illegal for the undertaking. The information shipped via the essay should be accurate. This is really crucial for the organization to stay and to get more clients.
We use buyer suggestions to assist decide what properties we feature. Because of that feedback, this deal is no longer obtainable for buy and was removed before we had been even contacted by ABC, though it stays widely out there on almost each different major travel web site. The 20 clients who reported issues with the property received refunds, as we do with all our deals. https://adamfantacy.tumblr.com/
airline. If you expend your clip and medium of exchange. organize a jellied capitalist with good easygoing, you can pick up writer around cash in hand, hopefully, you scholarly roughly your cognition to email them, such as those mistreatment activity engines. get out if they were and how to keep a My Web Page sneak a peek at this website Read More In this article link webpage Mouse Click The Following Web Site striking a perpendicular fill out of shoal to others. If you feel at assist with your choices. If person is not just divide. A lot of masses say that they’re solitary in their travel and fall the risks to you when it is down backward out of investing can pass My Blog https://filmlibrary.splashthat.com/
“Nice Post. It’s really a very good article. I noticed all your important points. Thanks” My Blog http://http://movcarnival.strikingly.com/
we prefer to honor quite a few other world-wide-web web pages on the net, even though they arent linked to us, by linking to them. Below are some webpages really worth checking out My Blog https://movieqube.jimdo.com/
nice blog. thanks for sharing
good article
Cream Kuda Jantan
Cream Pembesar Penis
Pembesar Penis
Hammer Of Thor
Hammer Of Thor Asli
Sex Toys Terbaru
Alat Bantu Sex Terbaru
Alat Bantu Sex Wanita Terbaru
thanks for share and keep it upmarvel contest of champions
wow. this article very creative. thanks for sharing
toko obat dan alat sex
perangsang wanita
klg herbal pembesar penis
cialis tadalafil
penis mainan tempel
memek silikon
vagina nungging
ahmedabad transport services
mumbai transport services
delhi transport services
bangalore transport services
chennai transport services
hyderabad transport services
Usefull information keep updating
first purchase coupons
Digital Marketing Company in gurgaon
Transporters in Delhi,truck transport
Cricket Score
Article Submission Sites 2019
Spruce Grove real estate
Homes for sale in Spruce Grove.
Find homes for sale in Spruce Grove. Updated hourly.
Spruce Grove real estate update. We are always updating our site to get the latest properties and reach as many people as we can with our blog
transporter for ahmedabad in mumbai
transporter for Mumbai in Delhi
online truck booking in Ahmedabad
goods carrier in Ahmedabad
transport companies in Ahmedabad
https://bitcointech.uk/showthread.php?tid=57650
http://cskurnik.eu/showthread.php?tid=66479
https://telesource.ir/entry.php?35332-Wrist-Tattoos-For-Women
https://forumafiliados.com.br/viewtopic.php?t=64580
http://forum.plast.vn.ua/viewtopic.php?t=60310
http://foro.parquesnacionales.gov.co/viewtopic.php?t=212041
http://craftscripts.com/forum/showthread.php?tid=894601
https://o-tattoo.info/
https://vittoriacolonna.org/
https://patient.org.in/
I’m impressed, I must say. Really rarely do I encounter a blog that’s each educative and entertaining, and let me tell you, you've gotten hit the nail on the head. Your concept is outstanding; the problem is something that not sufficient individuals are talking intelligently about. I'm very pleased that I stumbled throughout this in my seek for something regarding this. online casinos
Great post, thanks for sharing!
Window and Pressure Washing
Carpet Professionals
Thank you for posting!
Licensed Handyman
Wedding Photographer and Videographer
Commercial Contracting
Swimming Pool Repair
Foundation Repair
Bonita Springs Pool Maintenance
Love this craft, so pretty!
Lawn Mowing
I have found so many interesting thing in your blog and I really love that. Longboat Key Tutoring Keep up the good work!
I love this Paper Flower Tutorial. Vero Beach Tutoring Your idea is very artistic to use the paper for making this beautiful Paper Flower.
HI,
This is a post is amazing. I love it. Thanks for sharing.
Women Leather top
Hi there,
Very nice post and blog, Nice article and blog, I found it very explanatory and informative, thank you very much for sharing your knowledge and wisdom with us, we know how important is experience in our lives.
take care and stay positive
Your follower,
Lisa from Automóveis
Post a Comment